Saturday, April 28, 2012

Birds Nest Cupcakes

It's really looking like Spring, isn't it? Birds singing, puppies running, kids squealing in parks. Mesquitos biting, allergies flaring, and A/C required. But no biggie. Here's a sunny, happy little treat for you and the KIDS in your life, whether or not they're under 18.
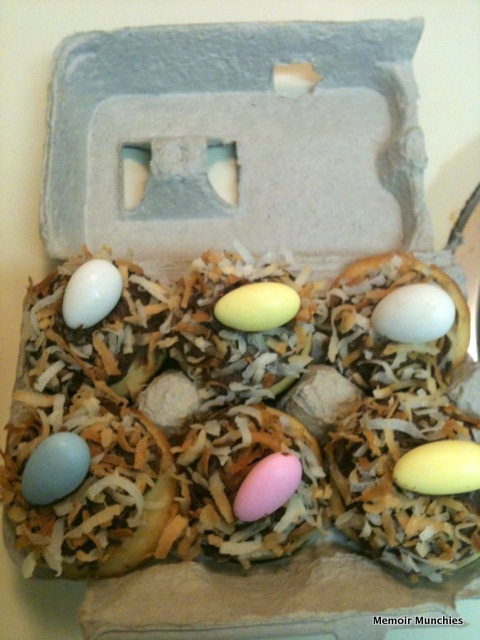

Birds Nest Cupcakes
(Almond cupcakes with chocolate frosting toasted coconut and egg candies)
Adapted from Martha
Makes 24 regular size or 40 mini cupcakes

This sweet treat is simple, fun and fancy free. 


1 3/4 cups all-purpose flour
2 t. baking powder
1/2 t. salt
2 1/2 cups shredded coconut
1 & 1/2 sticks unsalted butter, softened
1 cup sugar
2 eggs plus 2 egg whites
3/4 cup unsweetened coconut milk (reg milk works, too)
2 t. almond extract
1 t. vanilla extract
Pastel candy-coated chocolate eggs or almonds

step one: Preheat the oven to 350 degrees, putting racks in the middle of the oven. Line 24 muffin cups with liners. In a medium bowl, mix together flour, baking powder, and salt. In a second bowl (or your elec. mixer), beat the butter and sugar on medium speed until light and fluffy, about 5 minutes. Add the eggs, almond, and vanilla, then the dry mixture. Mix until blended and smooth. At the very end, add 1/2 cup shredded coconut and mix in.

step two: Fill each cupcake liner 2/3 full of batter. Bake 15 minutes, or until a toothpick comes out clean from the middle of the cupcakes. Let the cupcakes cool on a rack for at least 30 minutes.

step three: Prepare the quick frosting or use a jar of ready-made (I used chocolate, but if you have 7 extra minutes, it's worth making the one below...

step four: [While the cupcakes are cooling] Toast the coconut by spreading out 2 cups of it onto a rimmed baking sheet. Bake at 350 degrees for 5-10 minutes, shaking halfway through to avoid burning. NOTE: Watch this carefully, as it is VERY EASY to burn sweetened coconut in the oven. If you have extra, store in an airtight container and put on your ice cream, yogurt or oatmeal in the mornings; it'll keep for over a month! When the coconut is toasted to your liking, put into a small bowl. Try not to eat it all.

step five: Spread 1-2 TB of frosting onto each cooled cupcake. Then either 1)dip or 2)sprinkle 1-2 TB of coconut onto each frosted cupcake. Top with one or two candy eggs and -voila!- you have Spring in a Cupcake!

Quick Frosting:
Basic Vanilla Buttercream
Barely Adapted from Billy

1 cup (2 sticks) butter, softened
6 cups powdered sugar
1/3 cup milk
2 t. vanilla extract (clear in color if you have it)

Put the paddle attachment onto your mixer. Cream the butter until smooth, about 3 minutes. On low speed, add sugar, milk and vanilla. Mix 3 minutes or so, until light and fluffy. Spread onto cupcakes or cake.


These would be great as a gift or at a brunch, or maybe for kids to take to school (although I hear that isn't allowed in all schools these days...). Either way, happy weekend and happy baking!!

Laurel

Crunchy Sammie with Apples

Soup and Sammies

Poor Sam (our dog). Whenever we talk about having soup and sammies for dinner, he translates that phrase into, "Sam, it's dinnertime, buddy!" Oh, well. He eventually eats. Sometimes Soup and Sammies nights are planned because our budget is tight this week, or sometimes they're unplanned because we're just too tired to put a big, time-consuming masterpiece meal together. The other night was a little of both. We went shopping at Sunflower Farmers Market (again) and picked up some day-old rolls ($1 for 4 giant ones) that are shaped like a peanut. Matt had a bacon-goatcheese-basil-spinach-mayo sandwich, and mine looked a little more apple-y.


Crunchy Sammie
This hearty, easy sammie has crunch from the cucumber, crunch/sweetness from the apple, salty/smoky from the bacon & cheese, and crunch/blend from the spinach. Enjoy with your favorite homey soup. Surprising apple is the ingredient that makes this a standout.
makes 1 large sandwich (I eat 1/2 with a cup of soup)

1 large hoagie or roll, toasted
1 TB mayo (optional)
2 slices bacon (we used hormone/antibiotic-free), cooked
2 slices smoked cheddar
8 slices of cucumbers (thin, cut into rounds)
4 slices of apples (cut horizontally, or enough to spread a thin layer on to the sammie)
Handful of spinach leaves, about 1/2 cup

Assemble the sandwich layer-by-layer. If you'd like it warm, toast the bread with the bacon and cheddar on top. Devour with soup. Mmmmm.
Happy eating! Laurel

Wednesday, April 25, 2012

Cornmeal Pancakes and Strawberry Topping


Hello! It's time for pancakes...for dinner or mayhaps breakfast or even lunch. Anytime, really. This recipe is hearty, filling but not too heavy. Hope you enjoy!

Cornmeal Pancakes and Strawberry Topping
adapted from the Joy of Cooking
serves 3-4
1 1/2 cup  cornmeal
1/2 cup flour
1 teaspoon salt
2 t. baking powder
2 tablespoons melted butter
1 to 2 tablespoons honey or sugar
1 cup boiling water
1 cup of milk
1 egg
step one: In a large metal (or a heavy) bowl, combine the cornmeal, salt, butter and honey. Pour the boiling water over the top and whisk well to combine. Cover tightly and let stand at least 10 minutes. (I used plastic wrap to cover.)
step two: Preheat the griddle (medium-high) and spray with non-stick or add 1 TB butter to the griddle. (A non-stick pan works, too.) In a small bowl, whisk milk and egg. Combine into the cornmeal mixture. Combine the flour and baking powder, then add to the cornmeal mixture. Stir a bit. 
step three: Pour the batter (about 1/4 cup at a time) into the griddle/pan. Let cook until pancake stops bubbling on top and flip. Cook for 2 more minutes, or until slightly firm (no liquid).
step four: Serve with the strawberry topping. (below)

Strawberry Topping
1 1/2 to 2 cups strawberries
1/2 cup orange juice
1 t. vanilla or almond extract
1/3 cup sugar
step one: Chop the strawberries. In a medium pot on medium heat, combine all four ingredients. Stir and cover the pot. Let cook for 7 minutes, or until half of strawberries are liquified. (Stir occasionally during this time.) 
step two: Move the pot off of the heat and let sauce cool a little and thicken. Serve immediately on top of pancakes or ice cream.

Happy Eating!
Laurel

Tuesday, April 24, 2012

Ode to Bananas

It's time for a break from writing papers and being entertained by muted Nancy Grace visual headlines. It's also time to think about bananas. My thoughts of food and baking are numerous throughout any average day, but while I'm staying in a hotel near school (and no kitchen), my thoughts about recipe development and swirling cookie dough are getting way out of hand! So let's look back a little at recipes on bananas.

Bananas are such an amazing fruit. Sure, they're sweet. Yeah, they get mushy and bruises, but don't we all get mushy and have bruises at times? Does that mean we should just be thrown out with the rotten lettuce? Of course, bananas have a lifespan for consumption, but I love that really green bananas can be used for salty dishes (like green plantains made into chips--tostones) and really ripe bananas can be used for sweeter dishes (maduros are pan-fried for those sweet plantains served in Central and South American dishes). Bruised bananas make the best banana bread, and green bananas are great for banana splits. Now let's get to some recipes.


Banana whoopie pies
Bananaberry breadlet  


Banana muffins          Peanut butter banana oats


Coconut tropics salad      Fake beach smoothie                   


Chocolate banana bread


             Dairy-free banana shake      Mom's banana pudding                                           


             The banana bomb

Monday, April 23, 2012

Stuffed peppers

The first time I had one of these was not in Texas as a child. It was in Massachusetts. Yes, I said it. And it was pronounced "stuft PEH-puhs" I'll have you know. An old boyfriend's mother was so sweet, and she decided she would comfort my homesickness (and cravings for Tex-Mex) by making her stuffed bell peppers. Let me just say, I was so thankful for her efforts, but this is not a dish you'll EVER find on a menu in Tex-Mex country. Poblano peppers are usually the ones stuffed, and it's with cheese, cream sauce and chicken. She used rice, ground beef and pinto beans. :) But it was the thought that counted, so I've decided to bring a little authentic Tex-Mex flavor to this Yankee creation. It's easy, healthy, and pretty darn tasty. Enjoy.

Stuffed Peppers
4 servings

4 bell peppers, any color
1 cup brown rice or 1/2 cup quinoa
1 pound white meat chicken
3 TB + 2 TB cumin
1/4 + 1/2 t. salt
1/4 + 1/4 t. garlic powder
1/4 t. red pepper flakes
1 can black beans, drained and rinsed
1/4 cup (small handful) of chopped cilantro
1 cup salsa

Optional toppings: shredded cheddar or mozz, salsa, jalapenos, sour cream

1 Cook: In a rice cooker or pot, cook the rice according to package directions. In the meantime, cut the tops off of the peppers and scoop out the seeds (see photo). Set the peppers and the tops aside. Cut the chicken into small chunks (1/2 inch cubes). Heat a wok or large skillet on medium high. Add 1/4 cup water and the chicken and let cook for two minutes. Season with 3 TB cumin, 1/4 t. salt, 1/4 t. garlic powder and red pepper (optional). Continue to stir and saute until the chicken is thoroughly cooked. Set aside.

2 Combine: Once the rice is cooked, stir in the black beans and 2 TB cumin, 1/2 t. salt (if unsalted beans), 1/4 t. garlic powder, and the chopped cilantro. Preheat oven to 375.

3 Fill: Line a baking pan with walls with foil. (I usually use a 9-inch round for 4 peppers). Using a tablespoon, layer the rice & beans mixture, then 1 TB of salsa, then several bites of chicken multiple times until the pepper is filled to the top. You should have no more than 4 sets of layers. Finish the pepper by placing the top piece back on. Repeat this for the rest of the peppers. Bake for 35-45 minutes, or until peppers are slightly soft on the outside and the contents inside are piping hot. Garnish with shredded cheese, sour cream, jalapenos and salsa, if you like.

Enjoy the peh-puhs!


Happy eating!
Laurel

Sunday, April 22, 2012

Handheld Breakfast Cups


For most of us, sitting down to a hearty breakfast of bacon and eggs, toast and orange juice is a memory of yesteryear. Or at least the Cleavers. With a little bit of prep, this recipe combined the crispy bacon, fluffy egg and buttery toast, all in a handheld wonder. Meet the Breakfast Cup. (Insert Glinda the Good Witch opening song when she floats down into Munchkin Land.)

The Breakfast Cup is versatile, tastes great even made up to three days ahead of time, and is really filling. When you make them on a Sunday night (like tonight, ahem), let them cool and put them in plastic baggies or in small containers. In the rush of the morning, they can be zapped in the microwave for 45 seconds, and you've got a hot breakfast at your fingertips! I've made a batch and taken 3-4 to work and will grab them out of the fridge when I'm hungry. So let's make these thangs.


Breakfast Cups
These little cups of toast, egg and bacon are very versatile. You can trade the bacon for sauteed spinach or sausage crumbles. The wheat toast can be substituted for your favorite bread. Make ahead of time for a quick grab-and-go breakfast.


Adapted from Martha
Makes 8 cups (serving size: 1-2)


3 TB butter, melted
8 slices whole-wheat sandwich bread
8 slices bacon
8 large eggs
Salt and pepper


Optional toppings:
1/4 cup chopped cilantro, optional
1/2 cup shredded cheese, optional
1/4 cup salsa, optional


step one: Preheat oven to 375. Butter 8 muffin cups (if using a 12-cup pan, try to space them out as they expand). Flatten bread slices a little (using hands or a rolling pin) and cut each slice in half. Press the 2 halves into each muffin cup, overlapping slightly and making sure the bread reaches the edges of each cup. Then, brush the bread with the remaining butter.


step two: In a skilled or in the oven, cook the bacon over medium until almost crisp. It will cook more in the oven. Lay 1 slice of bacon in each bread cup and crack an egg over each. (If the eggs soak through the bread, no problem. See photo above.) Season with salt and pepper. Bake 20-25 minutes, or until the eggs are just set. Pop the cups out of the muffin pan and top with cilantro, cheese and salsa, if you like. Serve hot. Works for breakfast or brunch, with a side salad.


Happy eating!
Laurel

Saturday, April 21, 2012

Creamy Low-fat Broccoli Soup


As promised, a creamy (healthy) broccoli soup to pair with a crusty bread (like a baguette!). Sometimes I don't know what to do with the frozen veggies in my freezer. We get in a veggie rut at times and stock up on broccoli, okra, and stirfry mix...and all that broccoli (while I love it) get bor-ing. So let's whip up a soup and mix up our veggie tonight!


Creamy Low-fat Broccoli Soup
Adapted from Everyday Food, April 2012
1 1/2 pounds of broccoli (frozen or fresh), cut in bite-sized pieces
4 TB butter or margarine
1 medium yellow onion, diced small
2 cloves of garlic, sliced thin
1/4 cup flour
4 cups low- or no-sodium chicken broth
1 cup water
Dash of crushed red pepper (optional, for a kick)
1/4 milk or cream (optional!)
Salt and pepper, to taste


Gadgets needed: medium pot, knife, wooden spoon, blender


1base In a medium pot, melt butter. Add onion and cook, stirring occasionally, for 7 minutes. Onion should soften. Then add flour and stir for 1 minute. While whisking, simultaneously add 3 cups broth and 1 cup water and bring to a boil over high. (Stop whisking.) Reduce the heat and simmer for 10 minutes, only whisking occasionally.


2green (If the broccoli is frozen, use a 2nd pot & 1/4 cup water to cook broccoli until hot but not tender. Transfer to the butter mixture after cooked. If it's fresh broccoli, carry on.) Add the broccoli and bring to a simmer. Cook until the broccoli is very tender, 20 minutes. (If you want a little kick, now's the time to add the crushed red pepper flakes.)


3blend it, baby Using a 1-cup measuring cup, scoop a few cups of the broccoli mixture into your blender at a time. Blend until smooth; take care not to burn yourself!! Once the mixture is pureed, return to your pot. 


4season Season with 2 pinches of salt, a dash of pepper; add more, to taste. If you'd like the soup thicker, add 1/4 cup milk or cream. If you'd rather it be thinner, add that extra cup of broth.


Serve with crusty bread, garnished with a sprinkle of smoked paprika, sesame seeds, or shredded cheese. Yum

There ya have it, a healthy and creative way to eat those veggies. Have a wonderful Saturday! We're off to the Farmer's Market.

Happy eating!
Laurel


Friday, April 20, 2012

French baguettes


I'm thinking about starting a 12--step program for those of us afraid to use yeast. However, I would be able to come to group saying I am on step 2, I think. A challenge was put before me, and I kind of conquered. And if you're also afraid of baking with yeast, maybe you should conquer the French baguette, too. And you should be proud, because apparently even the French do not make their baguettes from scratch. Instead, they go to the local artisan bakery because those guys have fancy brick ovens. Even without a brick oven, we can do this!


French Baguettes
Makes 2 loaves
Guidance from The Joy of Cooking, page 601 in my version
Total time needed: 3 hrs, 30 minutes (You will only need 15 active minutes, the rest is letting it sit or bake.)

You'll need:
4 cups all-purpose flour + more for dusting
2 teaspoons salt
1 package (2 1/4 t.) active dry yeast
1 1/2 cups water at room temp
1 cup hot water
One large bowl + wooden spoon OR 1 Elec. mixer
1 clean kitchen towel
1 baking pan with parchment paper/baking liner


1mix it: In a large bowl or your mixer, combine 4 cups flour, salt, and yeast packet. Then create a little well in the center of the mixture and pour in 1 1/2 cup water, at room temp. Stir for about 12 minutes on low speed (by hand or mixer), until dough is soft and elastic. Look at that dough, isn't it a beauty?

2leave it: While dough is still in the bowl, cover it with a clean towel and let it rise in a warm place (75--85 degrees). This will take 2 hours, and the dough will double in size. Oo-lala. Go watch a movie, or run an errand, or get some work done.

3form it: Punch down the dough. To shape the dough into two baguettes, split dough in half and pat each section into a rectangle on a floured surface. Then roll the dough out away from you; continue rolling, pressing outward with your hands and tapering the dough toward the ends until you have a long, thin loaf. This will take 5 minutes, tops. Once you've formed the two loaves, it's time to let them rise (proof) again. On a non-stick baking pan (you can grease it, parchment paper it, or baking liner it), transfer the two loaves, giving them plenty of space to double in size. Cover them with a towel and wait 30 minutes.

4steam it: The waiting it over. Preheat your oven to 400 and grab a lined baking pan, putting it in the bottom oven rack. When the oven has reached 400 degrees, pour 1 cup of hot water into that preheated pan. Be careful because steam will quickly rise. Then uncover the loaves, score them (take a knife or blade and cut at least 5  3-inch slices into the bread) and put them in the top rack of the oven. See the photos above for an example of how to score the loaves.

5bake it: Bake the bread at 400 degrees for 15 minutes, then decrease temperature to 350 and bake for 25 more minutes. If you want to add an egg wash, mix 1 egg white with 1 tablespoon of cold water. Brush it on the top of the bread at this point and put it back into the oven for 5 more minutes. If you don't want the egg wash, just bake 5 more minutes (a total of 45 minutes in the oven). When it is fully baked, the crust should be golden brown, and the bottom will sound hollow when tapped. Try not to burn yourself when you slice open the enticing, fresh bread.

You did it! Woo-hoo! I hope this takes your adventures and bravery in the kitchen to the next level.


This was tasty with a broccoli soup I made. The recipe will follow tomorrow. :)


Happy eating!
Laurel

Thursday, April 19, 2012

Caramel Apple Star Oats

Do you have a favorite fruit? 

I go in phases...blackberries, apples, bananas, pineapple, and mango, usually. Well, my favorite fruit is the beautiful, tasty, in season (and that means affordable!) variety. But apples are great all year. I love that about apples. My favorite is jazz or pink lady, but that's probably because I haven't branched out to many types. I usually don't do green without a mixture of red, because I prefer sweet and crisp over tart and tangy. But we had green so this is what happened.

((2 tb white sugar*1 cup of water*1 tart apple*1 cup oats*2 cups water*Dash of cinnamon, drizzle of caramel or honey))
2 servings

I put 2 tb of white sugar in a pot and heated it on medium for 2 minutes, shaking throughout. This toasted the sugar.

Then, I added 1 cup of water. Then, I added in about 10 "star" slices of apple rounds, slicing horizontally. They boiled for 5+ minutes, until they got a bit tender.


Then, I cooked some oats on the side. I often use water instead of milk to cook oats because the water causes the oats to fluff up bigger than with milk. A dash of cinnamon. Poof!


Then I assembled a couple of slices of apple with the oats in between. I drizzled with a little caramel from my pantry, the Starbucks kind. This was a treat. Honey works, too. If you have pecans, they'd be lovely on top. Your apple stars will thank you. And I will come over for breakfast.

Pardon the Interruption (PTI): I just turned in my big research project. I treated myself with blogging to you. Now it's time for a few hours of sleep before morning class. I think I just lost 25 pounds of stress. Happiness and apples to you.


Happy eating!
Laurel

Wednesday, April 18, 2012

LOC Bites


Like I said yesterday, my sweet grandmother was Southern to the bone. One of her signature desserts was Chess Bars. It involved all of the staples for a Mississippi dish--butter, eggs, powdered sugar, and cream cheese. Not exactly for the faint of sweets. Sometimes she added lemon, but rarely. Usually the cake mix crust warrants the prominent flavor--BUTTER--but I thought it might be nice to jazz it up a little for my Waco friends.

I'm spending two weeks in Waco for Capstone class--let's hope these are the last classes of my life. I'm good with life long learning, but I need a break! After these two weeks, I'll present my research project for social work, wait a week, and then (hopefully) snatch up two diplomas. Glory, glory. But back to the sugar. Chess bars...with lime and orange...in mini muffin pans. Can these count as tarts? No, bites is much more technical and approachable.

The flop the first time around. Oops.


LOC Bites (Lemon Orange Chess)

gather 
yellow cake mix (the box)
3 eggs
1 stick butter, softened
1 box of cream cheese, softened (8 oz)
1 lb of powdered sugar
1 orange
1 lemon or lime

base Preheat oven to 350. Grease 24 mini muffin cups. In a bowl, combine a yellow cake mix, one egg, and one stick of margarine. Using a teaspoon, pat one teaspoonful of batter into each cup. Pat down with your fingers--this is the crust.

topper In a second bowl, combine cream cheese, 2 eggs, and 1 box (16 oz) powdered sugar together until smooth. A mixer smooths it out so well.

topper2 Split cream cheese mixture into two bowls. In one bowl, grate an orange and add the juice of less than 1/2 of the orange (2 TB). In the second bowl, add grate a lemon and the juice of 1/2 a lemon (2 TB). Whisk each of the bowls' ingredients separately.

assembly Using a teaspoon, spoon 1-ish teaspoon of the cake mix base in the bottom of each muffin cup. Press down with fingers, like it is a crust. Then, top with either 1 TB of the lemon or the orange filling. Bake for 13 minutes, or until the mini muffins are set and not Jello jiggly. Let cool in pan for 5 minutes, then transfer to the fridge for 1 hours.

Serve chilled. Share generously. Eat many.

Happy eating!
Laurel

Tuesday, April 17, 2012

Snap Beans and Potatoes

My grandmother's southern flair snuck out in her accent, adding syllables to seemingly short words. (can=cay-yun, Laurel=La-uh-rel), you get the gist. She always wore her pink lipstick and always combed her hair into a perfectly blond coif...well, she had a little help from the neighborhood beauty shop. And she cooked with heart, love, and butter. But she was pretty health-conscious, so she made lots of vegetables and low-fat dishes, unlike her seven sisters-in-law, who I swear are somehow related to Paul "Queen of Butter" Dean.


One of my grandmother's standard sides for a big dinner was "Snap beans and potatoes." Now, I don't think "snap beans" are technically a vegetable, but they're green beans with big chunks of red potatoes mixed in. You can add bacon fat, but why mess with nature? It's easy simple, and really filling. I've changed her recipe a little, using a wok instead of a soup pot, so the beans don't overcook (which is easy to do).


Mama's Snap Beans & Potatoes
Serves 4; 20 minutes to make


2 cups water
3 red/new potatoes, cut into slices or chunks (peels on)
Salt and pepper
1/2 pound of "snap beans," ends popped/cut off
1/2 teaspoon garlic powder
Dash of smoked paprika or Italian seasoning (optional)


In a large wok or large saucepan with a lid, preheat at medium high heat. Add a dash of salt, the water and the potatoes. Cover and cook for 6 minutes. 


Uncover and add the green beans, using a spoon or spatula to make sure they are halfway submerged in water. Cook for 6 more minutes, or until beans are bright green and cooked (but not soft and mushy). Drain and season with salt, pepper, and garlic powder, to taste. Serve hot. Top with smoked paprika or Italian seasoning for color and extra flavor, if you like.


This side works with most every meat or main dish, and it even works as a room temperature side at a picnic. Hope you enjoy this southern side from my grandmother's kitchen to yours.


Happy eating!
Laurel

Monday, April 16, 2012

Fancy Schmancy Butter


Lemon dill butter (top)

Remember having honey butter on warm biscuits or cornbread at your great aunt's house? Oo, I do.
 I think she bought it in a jar, but I have made it since and was surprised at how EASY it is.

My first introduction to a COMPOUND BUTTER was that silky, drippy honey butter that got all over my fingers, the tablecloth, and my shirts as a child. I don't eat a lot of butter and have reduced it significantly in baking/cooking, so I don't think of making butter recipes as a healthy practice in my attempt to eat whole foods. HOWEVER, in small amounts, a bit of a compound butter can significantly kick up the flavor in mashed potatoes, a fish dish, or other meal. They add moisture and a bit of creaminess to leftover chicken, rice and pastas, as well. My photo examples aren't the prettiest, which means practice makes perfect, but they taste pretty darn good. :)

Strawberry butter
Varieties of compound butters and their parings:

Honey Nut Butter (2 sticks butter, 3 TB chopped nuts, 4 TB honey): on toast, waffles, pancakes, or English muffins

Berry Butter (1 stick butter, 2-3 TB berry jam): on toast, in oatmeal (a dab!), on crackers, rolls, waffles or pastries

Pesto Butter (1 stick butter + 2 TB pesto spread): on chicken, fish, pork, in rice, pasta, on a baguette, roll, or breadstick, onto corn on the cob, broccoli, asparagus, add in olive oil- or broth-based sauces

Citrus Butter (2 sticks butter + zest of 1 lemon and 1 lime): on fish, scones, biscuits, in rice, risotto, on cornbread or pastries, on veggies

Lemon-Dill Butter (2 sticks butter + 1/4 cup fresh chopped dill + zest of 1 lemon + 2 TB lemon juice + dash of salt and pepper): on fish, chicken (adds moisture to leftovers!), pork, pasta, breads, and veggies, add in olive oil- or broth-based sauces, on baked potatoes and in mashed potatoes

Honey-Sage Butter (1 stick butter + 2 TB honey + 1 1/2 TB dried sage): on fish, pork, breads, carrots...experiment with this one, which is a little different!


Directions for all varieties:

Step One and Only: Soften butter, don't melt it. In a bowl, combine all ingredients and use the back of a large spoon to work the toppings into the butter until all blended.

Storage: Keep in a sealed container OR wrap in wax paper and store in a small box container (butter will mold into the shape of the container) OR wrap in wax paper and roll into round logs.

Fridge or Freeze? Either one works well. With the recipes with fruits or fresh herbs, I'd freeze them and just slice of a TB or so when you need it. If you (or your kids) are a lover of plain jane noodles, add a pat of the pesto or lemon-dill butter for a little kick of flavor.

Compound butter (in little jars or in wax paper "sticks") make great gifts for dinner party guests.


Special thanks to these folks for the ideas and lessons on compound butter:
A beautiful mess
Alton Brown
Serious eats
Simple bites

I'm in Waco this week, in the next-to-last week of my formal education career. Hope you're having fun wherever you are!

Happy eating!
Laurel

Saturday, April 14, 2012

Chicken Tortilla Soup


Good Saturday afternoon!

I almost missed the morning because I S.L.E.P.T. I.N. like a lazy lady. But yesterday was my last day at internship, so I celebrated by treating myself to sleeping in big time. And now it's time for you to experience some tortilla soup.

So I should tell you that I have a lifelong for tortilla soup. Some of my favorites are from unlikely sources (Casa Ole, Taco Cabana, I know) but other favorites are from very likely sources (Lupe Tortilla, El Rey, Tila's, Pappasito's, and El Tiempo, my home). In fact, in Houston (my homeland), there are "tortilla soup battles" like here and here. Is it ridiculous? Slightly. Is it fo'real? Absolutely.

I have made tortilla soup maybe 8 times...ever. While this might not make me an expert, my recipe is evolving into something easy, hearty, and colorful. Of course we all have our preferences...lots of cheese, mounds of avocado, with/without chicken, with/w/out sour cream, really/not so salty...but the base is always the same. It's a chicken stock foundation with tomatoes, vegetables and just a little meat (nearly always chicken). The toppings list can be as long as the simmering, if you like. My recipe is a mixture of one of Rachael Ray's, Emeril's and my favorite restaurants' versions. I will warn you...once you make a batch, you will have enough for days and days. And I don't think this is a leftover that gets old. I promise this is EASY to make, and it will take you half the time the SECOND time you make it. Practice makes perfect, right? If you can, chop/prep all of the veggies and chicken first, then start cooking. And recruit a sous chef, too.
Tortilla soup on a bed of lettuce, drained a little. Trust me, it's tasty.
Cha Cha Chicken Tortilla Soup
makes ten 12 oz. servings, maybe more
This Tex-Mex classic soup is hearty, full of vegetables, and complimented with well-seasoned chicken. It is slow cooked to marry the flavors. While not very spicy, additional peppers can be added to kick up the heat. Served best by itself, topped with cheese/sourcream/tortillachips/avocado, or on top of a bed of lettuce for a zesty salad.

4 garlic cloves, peeled and sliced thin
3 TB olive oil
1 yellow onion, peeled and chopped (bite-sized)
1 red bell pepper, bite-sized pieces
Salt and pepper
2 zucchini, sliced into half moons, 1/4 inch thick (leave peel on)
1 potato, sliced into very small square bites (leave skin on)
1/4 cup water + 1/4 cup water + 2 cups water
1 to 1 1/2 pound chicken (I use white meat), cut into bite-sized pieces
1 lime, cut into halves
1 can corn
2 roma tomatoes (a regular large tomato works, too), cut into bite-sized pieces
1 can Rotel tomatoes (with mild or medium chilis)
1 handful of chopped cilantro, about 1/2 cup
2 TB chili powder
1/3 (3-4 TB) palm-full of cumin
1/2 teaspoon crushed red pepper
2 whole small jalapenos, chopped (leave seeds in for more kick)
4 cups chicken stock--reduced sodium or no sodium

1CHOP: Chop all of the veggies and chicken. Turn your large crock pot onto high...or use a large soup pot on the stove (on medium).

2SAUTE: In a wok or large non-stick pan on medium-high heat, drizzle 1 TB olive oil over pan. Add in half of the sliced garlic cloves, a pinch of salt, a generous dash of pepper, and saute for 1 minute. Add in the onion and bell pepper, stirring and sauteing for 5 minutes. Onions should be clear and bell pepper should be slightly "soft." Transfer this to your crock pot or soup pot.

3SAUTE: In the same wok, add another 1 TB of olive oil and the rest of the sliced garlic. Let saute for one minute. Then add 1/4 cup water, zucchini and potato. Sprinkle with a pinch of salt and a dash of pepper. Cover with lid and let cook for 7 minutes, or until potatoes and zucchini are 50% cooked. If potatoes are still solid, let cook for a few more minutes. Transfer to your crock pot or soup pot.


4COOK: In that same wok, add the last 1 TB olive oil and let get hot. Add chicken and the second 1/4 cup of water, plus the juice of half of a lime. Stir. Let cook on medium high for a few minutes, adding a pinch of salt and pepper, 2 TB chili powder, and 1 TB cumin. Let cook until all of the water has evaporated and the chicken has cooked all the way through--about 7 minutes. Transfer the chicken to the crock or soup pot.


5COLOR: Add the cans of corn and Rotel tomatoes to the crock pot. Add: cilantro, three cups of chicken stock, 2 cups of water, remaining cumin, crushed red pepper, jalapenos, and juice of 1/2 a lime + the lime. Stir. Cover and let marry for at least an hour, stirring every 15 minutes or so.


6TASTE: This is the best part. After that first hour of cooking, grab a spoon and taste to see if the flavors are coming together. Add more salt and pepper, crushed red pepper or cumin, to taste. If you'd like more broth, pour in the remaining cup of chicken stock. Let cook for 30-60 more minutes (or, if you can't wait, eat a bowl now and let the rest cook). Then share your personal flaw of impatience with a friend, like you all.


7CHA-CHA: Top with your favorites and eat greedily.

Optional Toppings when served:
Shredded cheese (cheddar, jack, swiss, mozzarella, etc.)
Sour cream/Greek yogurt
Tortilla chips, crumbled
Sliced avocado
Guacamole
Chopped onions
Extra sliced jalapenos, habaneros
Crusty bread on the side
Soft tortillas on the side

I hope you'll try this one for your next dinner party, lazy Sunday night meal, or just because. This is colorful comfort food, with a twist. Happy weekend, dear friends.

Happy eating!
Laurel


Listening to: The Head and the Heart...beautiful, beautiful harmonies and strumming. Perfect for anytime.

Friday, April 13, 2012

Presto Pantry Pizza


I'm not great with dough. It gets gooey and sticky, and I get impatient when yeast is involved. But this dough is too easy and quick.

Matt & I were watching a Travel Network show on The Best Pizza in the USA. Beautiful cheesy pies were luring us in on the screen, and we both had instant cravings for pizza. He had work in 90 minutes and I decided to whip up a pizza. Or try desperately.

Using this yeast-free pizza dough as inspiration, here we go. Oh yeah, and we had very little food in the house that meshed with pizza. No tomatoes, shredded mozzarella, bacon, pepperoni, even bell peppers. Nothing! But we had spinach, fresh garlic, spices and "shakey cheese" (the stuff in the canister, I know, I know). This pizza is for nights when you can't bear to go to the grocery store...or get greasy delivery. This pizza is for curling up with a blanket, trying not to burn your mouth on the fresh dough that you just made from scratch(!), and for filling up your growling stomach quickly. While this is probably safe to make with 1 cup wheat flour and 1 1/2 cups all-purpose flour, I have yet to test that theory. So, for now, we'll indulge with all white flour...

It's not the prettiest, but it's completely delicious.
Presto Pantry Pizza
Makes 8-10 filing slices
Dough:
2 1/2 cups all-purpose flour
3 teaspoons baking powder
1 teaspoon salt
1 TB olive oil
1 cup water

Mix: Preheat oven to 400. Mix the dry ingredients together. Then add water and oil and work with your hands until dough is blended.


Knead: Form a ball and knead for a few minutes, dusting with extra flour if needed. Form into a round shape with hands. Dust a baking pan with cornmeal flour and place dough in center of pan. Spread out as thin as you prefer and fold up edges to form a crust.

Season: This is where you can get creative. This is what I added to the entire pizza:

  • Dash of crushed red pepper
  • Generous dashes of garlic powder
  • Pinch of sea salt
  • Generous dashes of Italian seasoning
  • Dash of dried rosemary
  • 1/3 cup parmesan
  • Light drizzle of olive oil, including over the crust
  • 2 cups of fresh spinach, steamed with fresh garlic, sea salt, and black pepper, then drained and "dalloped" all over pizza
  • For my hubby: 1/2 cup shredded cheddar cheese sprinkled over half of the pizza
If you have anything like these, I would add them:

  • Most any cheese (mozzarella, parmigiano-reggiano, asiago, feta, goat, fontega, jack, provolone, munster, swiss)
  • Can of mushrooms, drained
  • Pineapple
  • Lunchmeat/pepperoni/salami/bacon
  • Olives, banana peppers, pepperoncinis
  • Sauce/sliced tomatoes
  • Hummus
  • Broccoli, asparagus, bell peppers, onions, kale, etc.

And after!

Bake: Bake the pizza for 20--25 minutes at 400. Let cool for a few minutes. Slice and devour, with a glass of orange juice on ice--my favorite pairing with pizza. Yes, I know it's sorta weird. :)
Before...


Happy Friday night eating!
Laurel