Showing posts with label basil. Show all posts

Tuesday, October 1, 2013

Day 1: Basil Peach Preserves

The 31-day Fall Challenge is here!


Let's get started, with preserves. The humble, delicious idea of preserving your fruit is one my grandmother and her sisters used to do regularly. The fruits usually came from their gardens or a nearby farmer friend. My grandmother was one of the few (out of 8) that lived in a city, and farmers' markets weren't as popular back in the day; so she bought her fruit at the grocery store. Since I don't have a garden (yet), I'm in a similar boat. But, even if you aren't Farmer Joe or Jane, you can still make delicious preserves! I just discovered white peaches (I know, I know), so I used a bundle of these to make it happen (& they were on sale, bonus). White peaches are pretty sweet, so that allowed me to cut back on sugar.


Basil Peach Preserves
This recipe is the simplest I could find to make preserves, with a couple of my own changes. Preserves are incredibly versatile, not just for toast! Top it on pancakes or in crepes, mixed in oatmeal or yogurt, or use as a sauce for pork, shrimp, chicken or turkey. This can also be the base for a spicy jam that you top on cream cheese for an awesome holiday dip. The basil is present, but not overpowering.
Makes 3 cups of preserves

8-10 medium peaches  (about 3 1/2 pounds)
Pinch of kosher salt
Dash of cinnamon
1 1/2 cups sugar
Juice of 1 lemon
10 fresh basil leaves
 

Step One: Peel, pit and slice peaches into chunks. (If you want smaller pieces, pulse in a food processor until chunky.) I personally like chunky preserves for versatility, but it's your call.


 Step Two: Move the peaches to a large saucepan, adding salt, cinnamon, sugar and lemon juice. Bring to a boil, stirring frequently. Keep boiling and stirring until the bubbles slow down, the foam subsides, the fruit rises to the top and the jam sticks to a spoon when lifted (15 minutes total). Add in the whole basil leaves and stir. Let cool for an hour, and then transfer to the fridge until completely cooled.


Step Three: Transfer cold preserves to sanitized jars. The preserves can stay in the fridge for up to 2 months. Enjoy!


Adapted from:
Williams-Sonoma
Martha Stewart
Georgia Peach Council 


Happy eating!
Laurel

Monday, June 10, 2013

Linguini with Clam Sauce

Some of the best, most authentic pastas I've had also had the fewest ingredients.

Simple. Thoughtful. Delicious.

This also goes for my mother-in-law, Pat's, recipe for Linguini in Clam Sauce. It is creamy, yet light. Simple, yet elegant. Delicious yet not over-powering. And she graciously shared her recipe with me (and with you, too!).


Linguini with Clam Sauce
 You can use other pastas like spaghetti or fettucini, whatever you have on hand.

1/4 cup olive oil
1/4 butter or margarine (butter tastes better)
1/3 cup chives (3 entire stalks)
4 cloves of smashed garlic (use a press or chop by hand)

Step one: In a hot saute pan, combine the olive oil, butter, chives and garlic and saute for several minutes, until garlic is soft.

1 can progresso white clam juice
6 oz clams
6 fresh basil leaves, chopped
1 teaspoon dried oregano (or 1 TB fresh)

Step two: Drain the clams and KEEP the juice. Set the clams aside. In the saute pan, add the clam juice from the jar and from the clams can. Add the basil and oregano. Stir. 

4 roma tomatoes, diced
3/4 pound pasta

Step three: Then add the tomatoes and stir. Reduce heat and simmer for 20 minutes. During this time, boil water and cook the pasta al dente. After 20 minutes, add the clams in and heat it through to serve. (Don't leave the clams in too long, as they'll become rubbery.)

1/4 cup parmesan cheese

Step four: Once the pasta is cooked, keep a little bit of the water in the pot after draining. Scoop 2 TB of the clam sauce and 1/4 cup of parmesan cheese into the noodles and stir. Serve the noodles topped with plenty of clam sauce for a wonderful, classic Italian dish. Serve with a salad and crusty bread for dipping.

 I hope you enjoy this recipe as much as we have. It's so fun to be able to make a dish that Matt loved as a child (and to not screw it up too much!). 


Happy eating! Laurel

Thursday, May 24, 2012

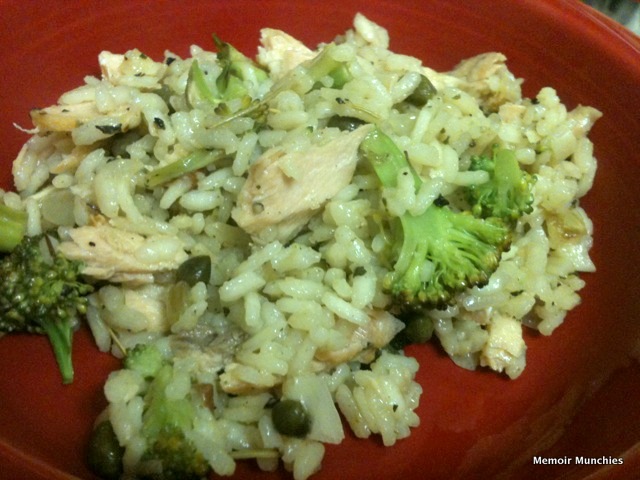
Salmon Risotto

EXTRA! EXTRA!
Memoir Munchies reaches 200 Posts!
I missed the 2-year anniversary of the blog in the midst of school craziness, so 200 posts deserves a little somethin' somethin.' 
Why not a colorful collage and some salmon risotto???


Have you seen this awesome invention in the grocery store? 
  • Texas is often way too hot to grow basil, so I usually buy it. However, I never use it all up before the little leaves wilt and go bad. So why not buy a frozen alternative? They're just tiny frozen "icecubes" of chopped basil leaves.


Salmon Risotto
4 servings

1 TB olive oil
1 TB butter
1 cup arborio rice
4 garlic cloves, chopped
2 shallots, chopped
2 cups low sodium chicken broth
8 ounces salmon filet
1 cup broccoli (fresh or thawed)
1/4 cup chopped almonds (optional)
1 TB fresh basil or 1 t. frozen basil
3/4 t. sea salt
1/4 t. pepper
1/2 t. each: rosemary + basil
3 TB capers

1 CHOP: Chop the garlic and shallots and set aside. Then, chop the broccoli (small bite-sized). In a large skillet or wok, heat on medium to medium high. Add olive oil and butter and let melt. Rotate skillet once so bottom is coated with oil/butter. Add the arborio rice, garlic and shallots and saute for 2-3 minutes, until rice is toasted and slightly brown (slightly!). Stir the mixture with a wooden spoon during the sauteing.

2 LIQUIFY: Add the chicken broth and stir. Add in the rosemary and continue to stir until rice has cooked and thickened to 'al dente' (cooked but still firm/chewy to the bite). This will take about 20-25 minutes.

STEP THREE: In the meantime, heat at medium a second skillet or a grill pan, spraying with nonstick oil (or 1 t. olive oil). Coat the bottom of the pan. Sprinkle a pinch (1/8 t.) of sea salt and a dash of pepper on each side of the salmon, and lay it onto the skillet/grill pan. Sprinkle the broccoli around the fish to "grill" it, too. Cook the fish at least 5 minutes on each side, being careful not to serve raw or overcook (fish will dry out). Remove the salmon from the heat.

STEP FOUR: Toss the cooked broccoli and almonds into the risotto and stir. Add the fresh/frozen basil, dried rosemary and dried basil, and stir.  Once the fish is cool enough to handle, flake into bite-sized pieces with a knife. Add the salmon to the risotto and gently stir. Add the capers and stir.  Lastly, add 1/4--1/2 teaspoon salt and a few dashes of pepper, to taste. Serve!


Thanks so much for reading, cooking, inspiring, and eating with me on this fun journey! I started this blog as a stress reliever--cooking in between classes, work and writing many, many papers. Now I'm finished with school and have found this blog to be so much more than just a "sanity keeper." I've learned so much, have connected with dear people over breaking bread, and have found a passion for healthy living and eating. Thanks to Matt (hubby), Sam (dog), family, friends, and coworkers for tastetesting each recipe and giving your honest (albeit very kind!) opinions. Sam...just got crumbs that fell to the floor and can't speak, so he's just there for support (and free smells). 

There are some exciting changes happening to Memoir Munchies...a little summer makeover, for starters. Stay tuned, and here's to 200 (or 2,000?) more posts!


Happy eating!
Laurel

Wednesday, October 26, 2011

How about a turkey burger, shall we?


The following is to be whispered in Texas...I've never been big on beef burgers. I appreciate the American cultural significance...drive-ins and roller skates and all that. I also love the varieties of meats (and non-meats) used, as well as the creativity in ingredients, pairings, the such (see HOPDODDY on the Restaurants page). The idea of burgers are kind of amazing. I like eating anything on a deliciously hot and fresh homemade bread/bun. However, my body's not so big on the beef. (Okay, I'll admit it, I can't do beef anymore...ever.) But, before you go and feel sorry for me by eating a 2 lb. Cow-on-a-bun in my honor, please don't. Save your limited artery-clogging space for chocolate macaroons (I'll post them later) or a variety of pumpkin-infused sweets (which I'll also reveal someday...promise), something sweet and delectable...not a mooing entree!

So let's make a turkey burger. Simple, easy, tasty.

Quickie Turkey Burgs (Trivia: Burg is German for "castle")
serves 4 grown-ups (1 burger will be bigger than the others...for the sweaty griller)


1.25 lb. lean ground turkey
4 garlic cloves, pressed
1 TB dried oregano
1 TB dried basil
1 t. chili powder
Dash of salt
Dash of thyme
4-6 crackers, crushed
1 TB mayo (optional)
1/2 t. crushed red pepper (optional)

Carefully mix all ingredients together in a bowl, using a spoon or your hands. Form 4-5 patties and put on a plate. Let flavors come together by chilling raw burgs in fridge for 1 hr. Grill and eat.

Potent Notables: Turkey burgers tend to fall apart on the grill. That's why I've added a few club crackers (crushed) and some mayo (egg whites keep the meat together, just like in baking). You can use breadcrumbs, most any absorbent bread/crackers crushed, or an actual egg white if you'd rather.

Happy eating! Laurel

Wednesday, June 1, 2011

Grilled Pizza

Grilled pizza with Greek shrimp (which'll come tomorrow)
Neither Matt nor I have ever put pizza on the grill, but we tried it last night. A success!

We found this recipe for a Chicken Margherita Pizza and modified it some. And we used this pizza crust. These definitely aren't the prettiest pizzas in the world, but they were really tasty!
Here's the technique:

When allowing the quick dough to rise in a covered bowl, make sure to spray the dough with cooking spray, as well as the bowl. I'd never done that before. Also, when you roll the dough out to form into your pizza shape, spread a little olive oil on the surface that you're kneading it on. That way, it won't stick to the grill and become a doughy mess.

Grilled Margherita Pizza
1 batch of easy pizza dough (see below)
1 cup pizza sauce
6 grape/cherry tomatoes
10 thin slices of mozzarella
1/2 cup (or more) chopped basil
2 garlic cloves, minced

In a saucepan, heat pizza sauce, tomatoes, and garlic.
After dough is rolled out into 3 or 4 pizzas, put it directly on the grill for 2 minutes or until dough get bubbly. Then, flip and add ingredients in this order: sauce, basil, cheese. Leave on grill until cheese is melted. Eat!


Easy Pizza Dough (this recipe is in the link above...I followed it very carefully)
1 packet yeast for pizza dough
1 cup warm water (around 100-120 degrees F)
2 tablespoons sugar
1 cup bread flour
3/4 cup whole wheat flour
1/2 cup cornmeal
1/2 teaspoon salt
3 tablespoons olive oil

Pour yeast packet and sugar into warm water and stir. Wait 5 minutes.
 In the meantime, mix all other ingredients in a large bowl. Add yeast water and stir until dough forms.
Once dough is forming, knead for 2 minutes on a floured surface. (If dough is too runny, add flour, 2 TB at a time to firm a bit.) Spray a second bowl with cooking spray, as well as spraying the top of the dough. Cover with saran wrap and let rise for 30 minutes.
After 30 minutes...(this is a good time to heat up the grill)...transfer dough to a baking sheet or counter with olive oil on the surface and on your hands. Separate into 3 or 4 balls (depending on how large you want your mini pizzas) and form into round crusts (about 8 inches in diameter). See above for rest of pizza recipe.


Happy Wednesday! Relax on this first day of June and bite into this melty, cheesy pizza!

Sunday, August 29, 2010

Say Yippee for Ziti!

After a long day at work yesterday, Matt & I made a classic that, strangely enough, I've never made before. BAKED ZITI! I don't think either of us have any Italian in our blood, but we felt quite Italian, pulling fresh rosemary and basil and throwing a big pasta together. Then we watched MTV's Jersey Shore...come on, so Italian! Haha We kind of threw stuff together for this:


EaZiti

1 TB olive oil
1/4 chopped onions
3 cloves garlic
3 cups frozen spinach (5 cups fresh)
1 lb. ground turkey
2 TB rosemary, chopped
2 jars (4 cups) your favorite marinara sauce
1 lb (ish) whole grain ziti
8 oz low-moisture lowfat mozzarella, slices
8 oz low-moisture lowfat mozzarella, shredded
4 oz Italian blend shredded cheese (Romano, Peccorino, Parm, etc)

1) Prehead oven to 400. Boil large pot of water, salting a bit.

2) Meanwhile, pour olive oil in skillet on med-high heat. Add onions and garlic and saute for a few minutes. Add frozen spinach to thaw, and then add ground turkey (if spinach is fresh, good turkey first and then add spinach). Slightly chop turkey into chunks (size of meatballs or so). Sprinkle in rosemary while turkey is cooking and toss all ingredients together until turkey is fully cooked. Drain excess liquid.

3) Add pasta to boiling water, cooking about 6 minutes or until al dente (cooked but still slightly firm).

4) Pour both jars of marinara in a large bowl and add turkey mixture to it. Tear mozzarella slices into large bites and stir into sauce. (Add other spices if you like, like dried basil, oregano, etc.)  

5) Drain pasta and add to sauce mixture. Stir well and pour entire mixture into a 9X13 pan.

6) Sprinkle shredded mozzarella and Italian cheeses over the top.

7) Bake for 20-30 minutes. Pasta is ready when cheese on top is all melted and a little "crispy" on the edges. Pair with a salad and some tasty bread!


A Crazy Easy Bread

As with some of my favorite recipes (mine and others'), they were created "by accident" because the original idea didn't work so well. Luckily, something good came out of it! This one was supposed to be twisted breadsticks for my parents' anniversary dinner...the dough was not cold enough, so they didn't work out, but this came out instead.

1 can of pizza dough
3 cloves garlic, chopped
2 TB rosemary, chopped
1 TB basil, chopped
2 TB butter/margarine
 
1) Roll out dough and sprinkle garlic and herbs throughout. Knead together and roll into a ball.

2) Bake as directed on package. Spread butter on top and allow to melt all over. Serve warm.
 

I love pasta because it tastes better after the day it was made. Hmm, I see a lunch plan...